Create a Reminder Rule

Rule tells Timelier which calendar to monitor, which events to look for, and how and when to send reminders. You can create a rule quickly using the Simple Rule Wizard or build complex logic using the Advanced Rule Editor.

Method 1: The Simple Rule Wizard

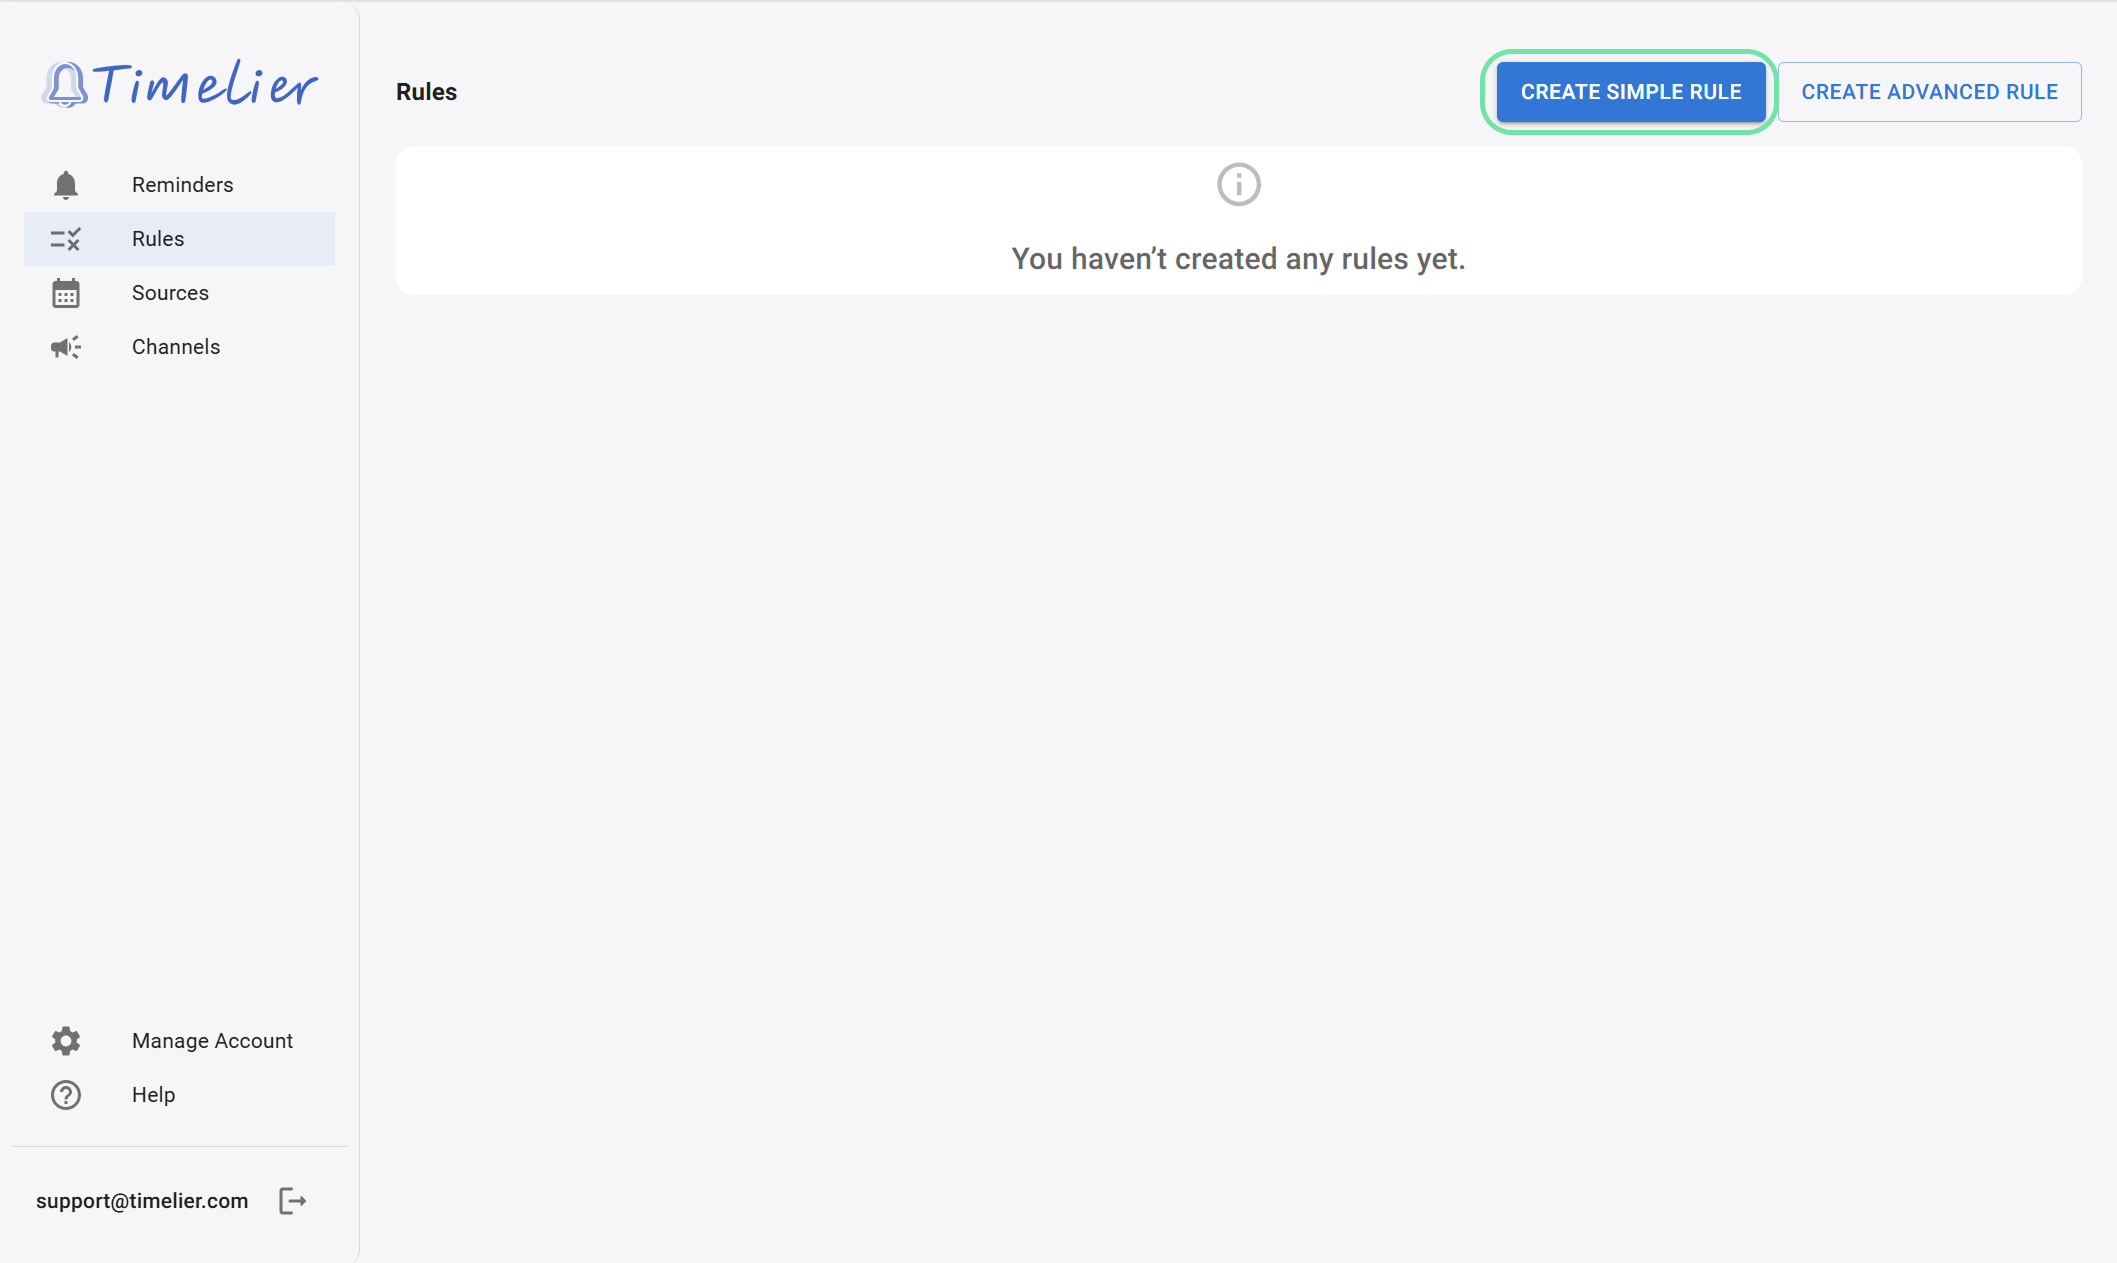
To create a new rule, go to the Rules page and click the Create Simple Rule button. This will launch a wizard that will guide you through the process.

1. Select Calendar

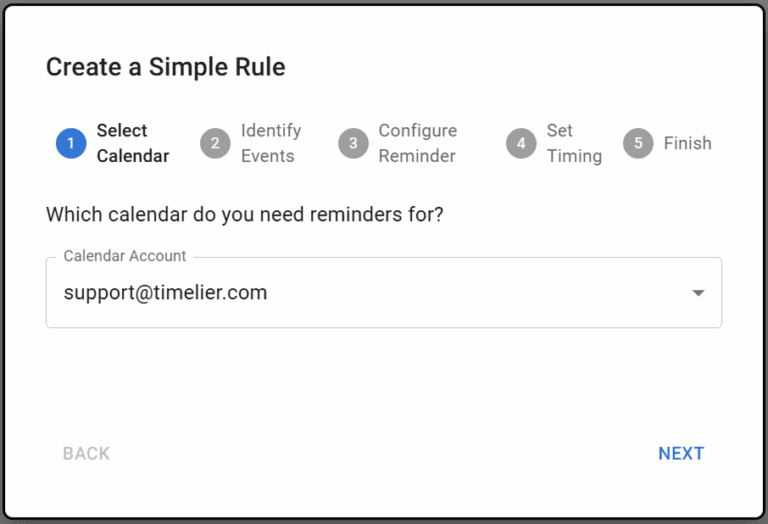
First, choose the calendar that contains the events you want to be reminded about.

timelier screenshot

2. Identify Events

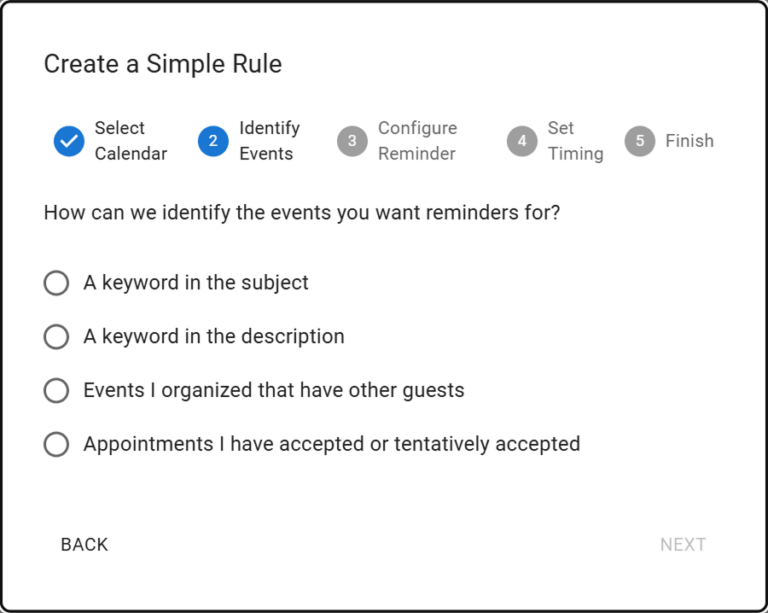
Next, tell us how to identify the events you want reminders for. The Wizard has three of the most common way people can identify the events for which they want reminders:

  • A keyword in the subject: This is useful for events that always have the same word or phrase in the title. 
  • A keyword in the description: This is useful for events that always have the same word or phrase in the description/details of the event. 
  • Events I organized that have other guests**: This is great for reminding attendees of meetings you’ve scheduled.
  • Appointments I have accepted or tentatively accepted**: This option is perfect for getting reminders for all the events you’ve agreed to attend or are considering attending.
 
**Not available for ICS calendars because ICS calendars do not reliably include attendees or their response statuses.
simple rule wizard step 2
Set reminders for events with 'practice' in the subject

3. Set Reminder Channel

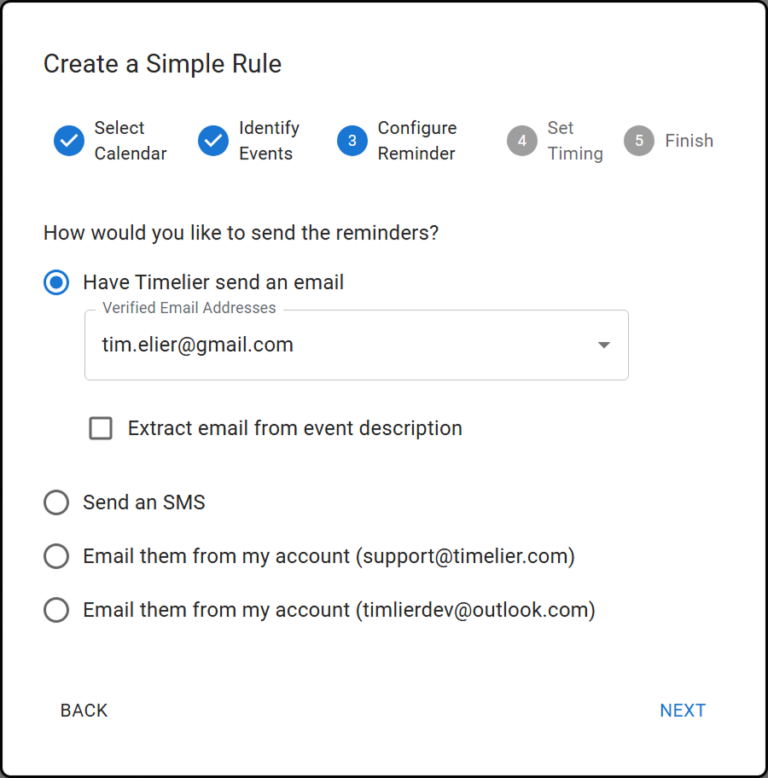
Now, decide how you want to send the reminders. You can:

  • Have Timelier send an email to predetermined address(es): We’ll send an email from our address to any verified email addresses you choose. To verify additional email addresses see verify additional email addresses.
timelier screenshot
An email will be sent from [email protected] to [email protected]
  • Have Timelier email event-specific recipients: When this checkbox is checked, the address(es) to which an email reminder will be sent is extracted from the body of the event/appointment. With this type of rule in place, putting the phrase “email reminder:” followed by a valid email address (e.g., email reminder: [email protected]) in the description of the event will trigger an email sent from [email protected] to [email protected]. You can separate multiple email addresses with a comma (e.g., email reminder: [email protected],[email protected]).  Each email address counts as a separate reminder in terms of your Timelier usage.
timelier screenshot
Emails will be sent from [email protected] to email addresses indicated by "email reminder:" in the event description/details
  • SMS to a predetermined number: When you provide a specific number, an SMS text message will be sent to that number for each event that matches the reminder rule. If the phone number you enter is not verified, you will see a gray question mark next to it, which means the number of SMS messages you can send to that number will be limited to 1 per day and 4 per month. See verify a phone number for more details.
Timelier screenshot
An SMS message will be sent to 321-555-1234
  • SMS to an event-specific number: When this checkbox is checked, the phone number to which an SMS text reminder will be sent is extracted from the body of the event/appointment. With this type of rule in place, putting the phrase “sms reminder:” followed by a 10-digit U.S. phone number (e.g., sms reminder: 3125551234) in the description of the event will trigger an SMS reminder for that event. You can separate multiple phone numbers with a comma (e.g., sms reminder: 3125551234,2015551234).  Each phone number counts as a separate reminder in terms of your Timelier usage.
An SMS text message will be sent to phone numbers indicated by "sms reminder:" in the event description/details.
  • Email attendees from my account: An email will be sent from your connected Google or Microsoft account to the event attendees. Since the email comes from you (rather than Timelier), it is more likely your guests will read it! You can choose to email attendees based on their response status. The most common configuration here would be to email people who have accepted, who have tentatively accepted, or who have not respond (i.e., reminders not typically desired for guests who have declined).  
Timelier screenshot
A reminder will be sent from [email protected] to attendees that have accepted or tentatively accepted.
  • Email extracted recipients from my account: When this checkbox is checked, the address(es) to which an email reminder will be sent is extracted from the body of the event/appointment. With this type of rule in place, putting the word “email reminder:” followed by a valid email address (e.g., email reminder: [email protected]) in the description of the event will trigger an email sent from your account to [email protected]. You can separate multiple email addresses with a comma (e.g., “email reminder: [email protected],[email protected]”).  Each email address counts as a separate reminder in terms of your Timelier usage.
timelier screenshot
Reminders will be sent from [email protected] to email addresses indicated by "email reminder:" in the event description/details.

4. Set Timing

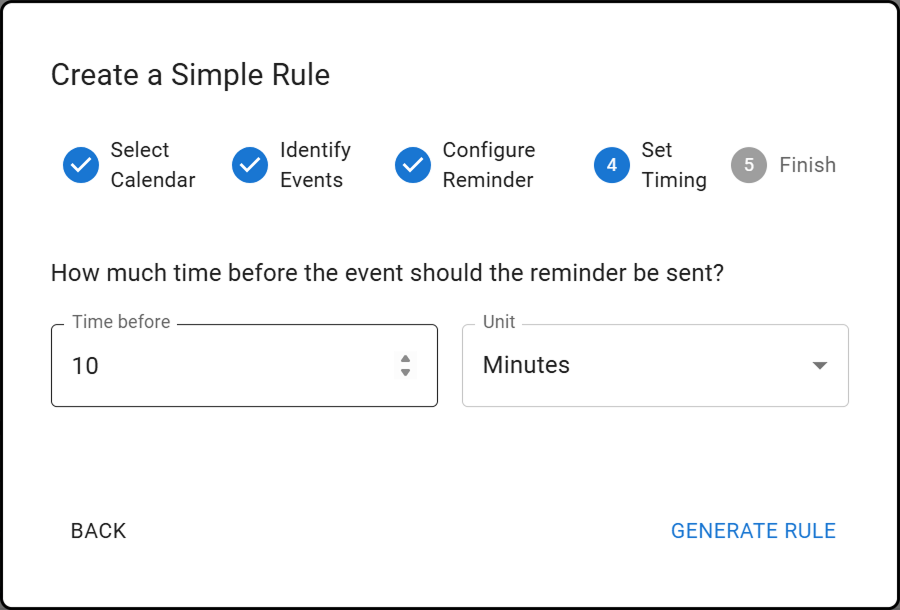
Specify how many minutes before the event you want the reminder to be sent.  10 minutes, 60 minutes (1 hour), 1440 minutes (1 day), whatever you like up to 1 week.

timelier screenshot

5. Complete the simple rule wizard

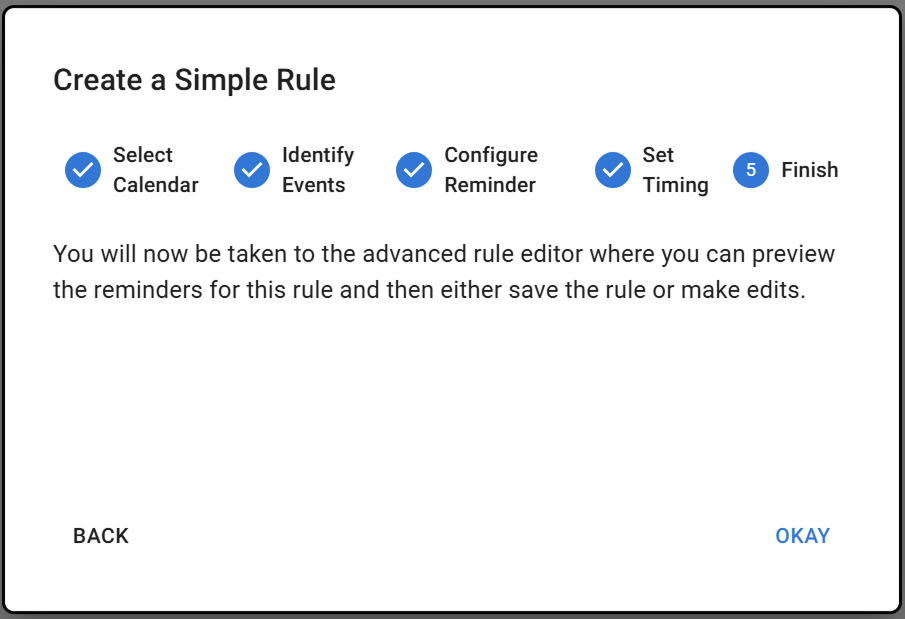
The simple rule wizard is just an aid for filling out the advanced rule editor. After clicking “generate rule” in the simple rule wizard, you’ll be taken to the advanced rule editor and it will be filled out based on what you selected in the simple rule wizard.

Typically the first thing you want to do is click “preview reminders” at the bottom of the advanced rule editor form.  This will show you a list of the reminders that would be generated for the next week based on the rule you have.

If the reminders are not what you expected, you can make changes in the advanced editor form.  If you need help, please don’t hesitate to reach out via the chat or by emailing us at [email protected]

timelier screenshot

FOR MORE CONTROL: THE ADVANCED RULE EDITOR

The advanced rule editor gives you full control over your reminder rules. You can get to it by clicking the Create Advanced Rule button on the Rules page, or you will be automatically taken there after completing the Simple Rule Wizard.

1. Choose Your Calendar Source

  • In the “select a source of events” dropdown, select one of the Google or Microsoft Accounts you have connected as a source.

  • In the calendar dropdown, select one of the calendars. Unlike with the simple rule wizard, the advanced editor lets you select a calendar that is not the primary calendar on the account.

    • For a Microsoft account, the primary calendar on the account is always named “Calendar.”

    • For a Google account, the default name of the primary calendar is your email address, but if you renamed it in Google that name will be shown in the dropdown.

In the screenshot below, the [email protected] Google account has been selected and the primary calendar “[email protected]” has been selected as the calendar.

2. Define Filters to determine which events will receive reminders.

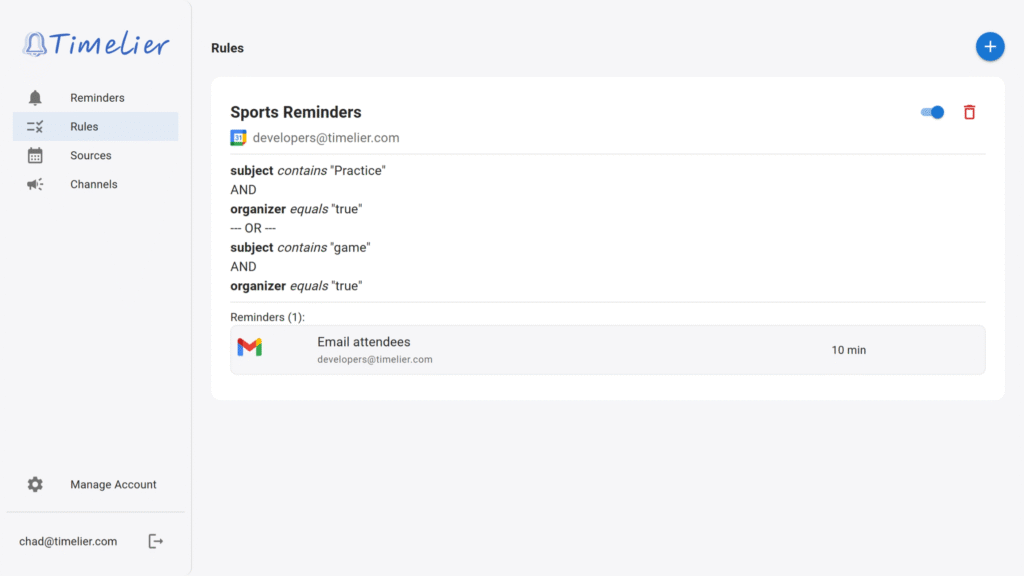
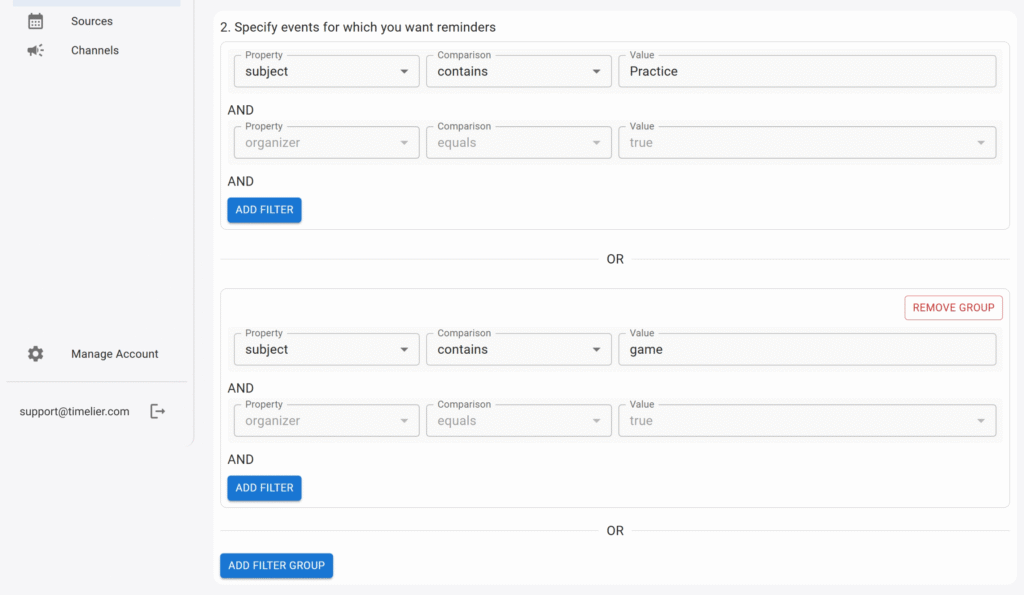
To determine which events receive reminders, you setup filters based on properties of the events.  An event receives the reminders for this rule when the filter expression is true for that event.  For example, the rule in the screenshot below will trigger reminders for events where: 

  •  the subject contains ‘Practice’ AND you are the organizer of the event 
  • OR
  • the subject contains ‘game,’ AND you are the organizer of the event


You can filter/select events/appointments based on the following properties

  • Subject – the name of the event. For an invite, this is what appears in the subject of the invite email.

  • Description – The details of the event when you click into it.  This is what appears in the body of an email invitation.

  • Attendees – the email addresses of the people invited to the meeting
  • Start Time – start time of the event

  • End Time – end time of the event
  • freebusy – corresponds to the “show as” field of the event. options are:

    • free
    • tentative
    • busy
    • oof (Out of office)
    • workingElsewhere
    • unknown
  • Response status – Your response status for the event. Options are: 

    • organizer – you are the organizer of the event
    • tentativelyAccepted – you have tentatively accepted the event
    • accepted – you have accepted the event
    • declined – you have declined the event
    • notResponded – you have not responded to the invite for the event
  • organizer – true if you are the organizer of an event; false if you are not

  • Categories (only shown for Outlook calendars)
  • Colors (only shown for Google calendars) – a dropdown listing the default Google colors – Lavendar, Sage, Grape, Flamingo, Banana, Tangerine, Peacock, Graphite, Blueberry, Basil, Tomato

  • Categories (for Outlook calendars) – a textbox for keyword matching against your outlook categories


For each property you can choose from the available comparison types:

  • equals – For text fields, equals evaluates to true if the selected property of the event exactly matches the text you have entered into the Value box. For time fields, equals evaluates to true if the time in UTC (i.e., accounting for the offset of the selected time zone) exactly matches the time determined by the values entered in the Time and Time zone fields.
  • does not equal – true if the selected property of the event exactly matches the text you have entered into the Value box
  • contains – true if the selected property of the event contains the text you have entered into the Value box
  • does not contain – true if the selected property of the event does not contain the text you have entered into the Value box
  • starts with – true if the selected property of the event starts with (exact match) the text you have entered into the Value box
  • ends with – true if the selected property of the event ends with (exact match) the text you have entered into the Value box
  • is before – For time fields, equals evaluates to true if the time in UTC (i.e., accounting for the offset of the selected time zone) is before the time determined by the values entered in the Time and Time zone fields.
  • is after – For time fields, equals evaluates to true if the time in UTC (i.e., accounting for the offset of the selected time zone) is after the time determined by the values entered in the Time and Time zone fields.


Complex filter expressions

The filter criteria are organized into Filter Groups.  To add a criterion to a filter group, click the ADD FILTER button.  The criteria within a filter group are joined by AND, meaning that an event must meet all criteria of the group to be a match for that filter group. 

To add a filter group, click the ADD FILTER GROUP button. Filter groups are joined by OR, meaning that an event only needs to match one filter group of a rule to be selected by the rule.

In the example below, reminders will be generated for any event where you are the organizer and the subject contains “Practice” OR you are the organizer and the subject contains “game.”

timelier screenshot

3. Set type, time and message for reminders

In this section, you define how and when your reminders are sent. You can add up to three reminders per rule.

Reminder Types

You can choose from several channel types for your reminders. Here are the details for the most common ones:

A. Email from Timelier

These reminders are an email sent by Timelier (they come from [email protected])

Send to verified address(es)

This is for when you want to email the same people or all events that trigger the rule. (e.g., events for which you always want to remind yourself, family members, a specific colleague, a team distribution list, etc.) The advantage of using verified email addresses (as opposed to extracting recipients from the event description) is that you can send more emails to them more often. There are much stricter limits for unverified email addresses.

  • Select a channel that says “Email from Timelier”.
  • In the “Verified Recipient(s)” dropdown, select one or more email addresses from the list. You can add new verified addresses in your account settings. To add verified recipients see Verify Additional Email Addresses


Extract recipients from event description

This is mostly useful when you want to email different people for different events and those people are not attendees on the event itself (e.g., possibly because you are using an ICS calendar, which does not include event attendees). 

  • Check the box that says “Extract recipients from event description”.
  • Timelier will look for “email reminder:<email address>” in the description of events and email those recipients from [email protected].

Note: for “Email from Timelier,” an unverified email address extracted from an event description can only be emailed once per day and up to 4 times per month.


B. Email from me

To use this option, you must connect at least one of your Gmail or Outlook reminder channel. This option sends an email directly from your connected Google or Microsoft account to the attendees of the event. You can filter which attendees receive the email based on their response to the event invitation (e.g., accepted, tentative). This is perfect for sending targeted reminders to make sure confirmed guests are reminded of the meeting and/or to remind guests to respond to your invite.

  • How to configure:

    1. Select a channel that says “Email from me – <your email address>”.
    2. Either:

a. In the “Response statuses to remind” dropdown, select the response statuses of the attendees you want to email. For example, you could send a reminder only to people who have “accepted” the invitation, or a reminder to those who have “not responded”.

b. Check the box to “Extract recipients from event description”

Whether you choose option 2a or 2b, “Me” (you, the event organizer) is always included as a recipient.

  • Available Attendee Statuses:

    • accepted – remind guests that have accepted the invitation
    • tentative – remind guests that have tentatively accepted the invitation
    • declined – remind guests that have declined the invitation
    • no response – remind guests that have not responded to the invitation

C. SMS

This option sends an SMS reminder to a verified phone number. This is useful when for important reminders to specific people where they are more likely to see a text message in time than an email (e.g., yourself, a child, a spouse, a colleague who is often away from their email, etc.) 

  • How to configure:
    1. Select a channel that says “SMS”.
    2. In the “Verified Phone Number” dropdown, select the phone number you want to send the SMS to. To add additional numbers see Add a Phone Number for SMS Reminders.

Customizing the Reminder Message

For any reminder type, you can customize the message that is sent. The message editor supports placeholders to dynamically insert event details into your reminder.

  • Available Placeholders:
    • {subject}: The subject of the event.
    • {location}: The location of the event.
    • {start}: The start time of the event.
    • {joinurl}: The URL to join the event (e.g., Google Meet or Microsoft Teams link).

Example:
Assume a Zoom meeting with the subject “Team meeting” that starts at 1:00pm. Then the template

Reminder: {subject} is starting at {start}. Join here: {joinurl}

will result in a reminder message that reads:

Reminder: Team meeting is starting at 1:00pm. Join here: https://zoom.us/123345678

4. Click “Preview reminders”

When you click the Preview Reminders button, the rule you have created will be applied to the calendar you have selected. Shown below the button is a list of the reminders that would be generated if this rule was saved. Note it also shows events that do not meet your filter criteria and thus would not generate remidners with this rule.

5. Save the Rule

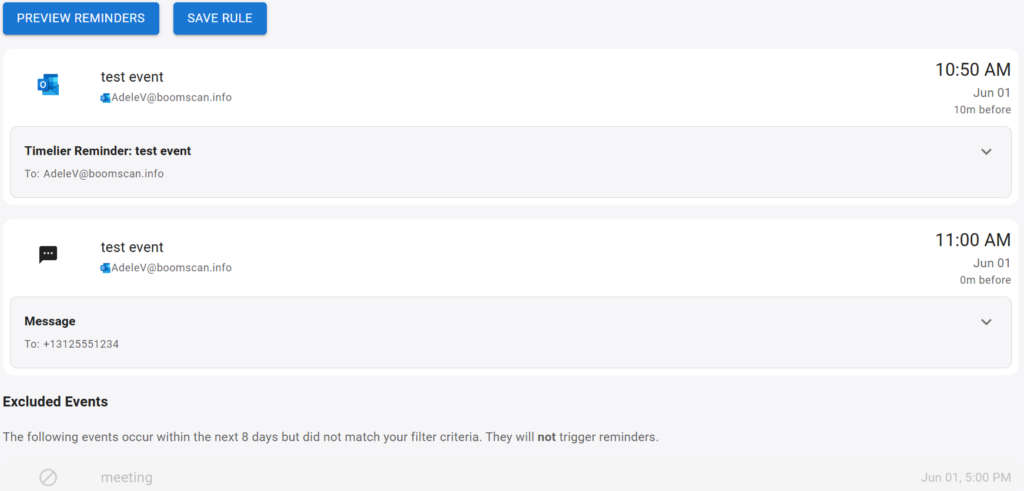
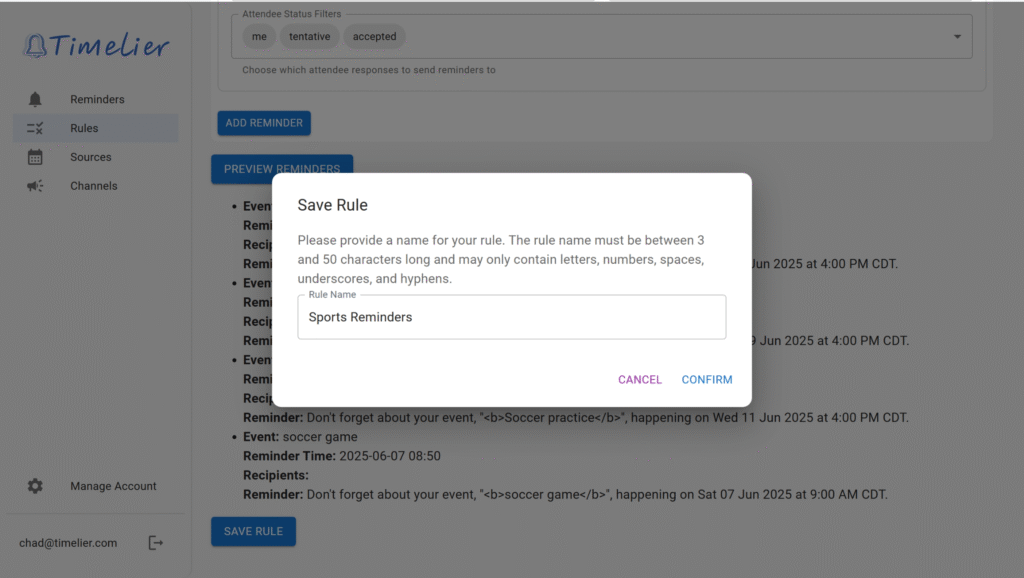
If the list of reminders looks correct for what you are trying to achieve, click “Save Rule.” 

A dialog will popup asking you to give a name to the rule. Use a descriptive name as it will help you determine which reminders are coming from which rules if you setup multiple rules.

6. View your Rules

Once you have created a rule, it will show up on your Rules page. The card for each rule shows:

  • Disable Rule switch – Turning this off will disable the rule. When the rule is disabled any scheduled future reminders will be deleted. Additional reminders for this rule will not be scheduled unless and until the rule is reenabled.
  • Delete Rule button – Click the trash can icon to delete a rule. When a rule is deleted all scheduled future reminders will be deleted and the log of past reminders will be deleted.
  • Rule name (example below: “Sports Reminders”)
  • Event source – The calendar that is associated with this rule (example below: The Google calendar “[email protected]”)
  • Rule filters/criteria – The filters/criteria that determine which events get reminders according to this rule
  • List of reminders – The list of reminders that will be generated for events matching the rule. (In the example below, one email will be sent from the Google account 10 minutes before the event)  
Timelier screenshot