
The Rules dashboard in Timelier is your central hub for monitoring, editing, toggling, and maintaining all your automated calendar reminder workflows.
Overview
Every rule you build—whether through the Simple Rule Wizard or the Advanced Rule Editor—is listed as a card on the Rules page (accessible anytime by clicking Rules in the main app navigation).
From this screen, you have instant visibility into:
- Which calendar account each rule is actively scanning
- The exact filter conditions required for an event to qualify for reminders
- The attached reminders, delivery channels (Email, SMS, Teams), and timing schedules
- Full message templates with live placeholder syntax
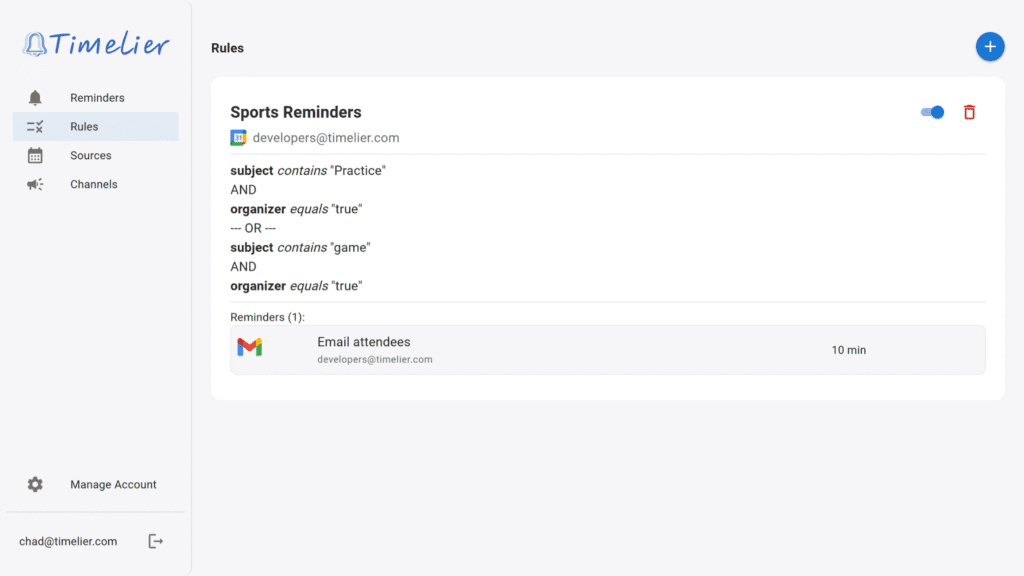
The Timelier Rules management screen displays all created rules, their filter logic, and reminder schedules.
Page Actions
At the top of the Rules page, two primary action buttons let you create new reminder rules:
- Create Simple Rule: Launches the step-by-step modal wizard designed for common reminder setups in under two minutes.
- Create Advanced Rule: Navigates to the full rule editor where you can craft custom multi-group filter expressions, configure multi-channel delivery, and add up to three distinct reminder schedules per rule.
Anatomy of a Rule Card
Each rule card provides a comprehensive summary of an automation workflow without requiring you to open an editor:
The top row of every rule card displays the rule's descriptive name along with quick-action controls:
-
Active / Disabled Toggle Switch: Use this switch to temporarily pause a rule
without losing your filters or templates.
- Disabling a Rule: When you switch a rule off, a confirmation dialog appears: "Are you sure you want to disable '[Rule Name]'? Future reminders for this rule will be deleted." Any pending reminders currently queued in the dashboard for upcoming events under this rule are immediately cancelled.
- Re-enabling a Rule: When switched back on: "Are you sure you want to enable '[Rule Name]'? Reminders will be created in the next 5 minutes." Timelier's background engine runs a sync cycle and queues upcoming reminders for matching calendar appointments.
- Edit Rule (Pencil Icon): Opens the rule inside the Advanced Rule Editor with all criteria, channels, and custom message bodies loaded, allowing you to update filters or timing and click Save.
- Delete Rule (Trash Icon): Opens a deletion confirmation dialog: "Are you sure you want to delete the rule '[Rule Name]'? All past and future reminders for this rule will be deleted. This action cannot be undone." Clicking Confirm permanently removes the rule.
Immediately below the rule name, you'll find the calendar provider logo (Google Calendar, Microsoft Outlook, Apple iCloud, or ICS feed) and the specific email or account identifier that this rule monitors.
The filter section translates the rule's matching logic into clear, readable statements:
- Target Property: Displayed in bold (e.g.
subject,organizer,attendees,freebusy). - Comparison Operator: Displayed in italics (e.g. contains, equals, is after).
- Value: Displayed in quotation marks (e.g.
"Consultation","true") or formatted time and timezone (e.g.09:00 AM (America/Chicago)). - AND Logic: Rules with multiple criteria in the same group require all conditions
to match (separated by
AND). - OR Logic: Rules with multiple filter groups display a
--- OR ---divider. Events matching either group will trigger reminders.
Under the Reminders (N): header, each scheduled reminder configured for the rule is rendered as an interactive item:
- Channel Type & Logo: Clearly identifies the delivery path—whether sending an automated Email from Timelier, personal Email from me via your connected Google or Microsoft mailbox, an SMS text, or a Microsoft Teams message.
-
Account & Delivery Tags: Shows the sending account and helpful badges:
- BCC: Indicates attendees are placed in BCC to protect privacy.
- Extracted: Indicates recipient emails or
phone numbers are dynamically pulled from
Email reminder:orSMS reminder:keywords in the calendar event description.
-
Lead Timing: Displays exactly when the notification goes out relative to the event
start time (e.g.,
1d before,2h before, or15m before). -
Collapsible Message Preview: Click the subject line or the arrow icon () to expand and read the full customized message template, verifying dynamic placeholders such
as
{subject},{startTime}, and{location}.
Editing an Existing Rule
To modify an active rule:
- On the Rules dashboard, locate the rule card you wish to modify.
- Click the Edit (Pencil) icon in the card header.
- The app opens the Advanced Rule Editor pre-populated with your rule's existing source, filter groups, and reminder settings.
- Make your adjustments—such as updating template text, modifying timing, or adding another filter criterion.
- Click Save Rule. Your rule updates immediately, and upcoming reminders are re-calculated according to the new settings.
Deleting a Rule
When you no longer need an automated workflow:
- Click the red Delete (Trash) icon on the rule card.
- A confirmation dialog opens warning that "All past and future reminders for this rule will be deleted. This action cannot be undone."
- Click Confirm to delete the rule.
Troubleshooting Disconnected Calendar Sources
If Timelier encounters an authentication or permission error while accessing your source calendar (such as an expired Microsoft 365 OAuth session or password reset):
- Attempting to toggle or update the rule may display a notification alert: "We cannot access the source calendar. Please go to sources, click the menu for the source and click 'reconnect'."
- To resolve this, navigate to the Sources page in the main navigation, locate the flagged calendar account, and click Reconnect to refresh your provider credentials.