
Learn how to verify recipient email addresses in Timelier so you can deliver automated calendar reminders to staff, team members, contractors, and clients through the Email from Timelier channel.
Overview & Purpose
Timelier provides two distinct ways to send reminder emails:
- Email from Me (Connected Account): Reminders are dispatched directly through your connected personal or work Gmail or Microsoft Outlook mailbox. (See Connect Notification Channels).
- Email from Timelier (System Mailer): Reminders are sent through Timelier's high-speed cloud email service (SendGrid).
To protect recipient privacy and prevent unwanted spam dispatches through our shared mail infrastructure, the Email from Timelier channel requires that any pre-configured destination email address be verified before automated reminders will be delivered to it.
Sending Limits: Verified vs. Unverified Recipients
When sending reminders through the Email from Timelier channel, strict sending thresholds distinguish between verified contacts and unverified recipients:
| Recipient Status | Daily Limit (Per Recipient) | Monthly Limit (Per Recipient) | Behavior & Purpose |
|---|---|---|---|
| Unverified Recipient (Extracted from event notes) |
1 reminder / day | 4 reminders / month | Protects recipients against spam and accidental flooding. If a rule triggers additional reminders for the same unverified address, they are skipped with code skipped-unverified-limit. |
| Verified Recipient (Completed code or link) |
Unlimited (Up to plan quota) |
Unlimited (Up to plan quota) |
Per-recipient limits are fully lifted. Verified contacts can receive multiple notifications per day, recurring appointment series, and last-minute updates. |
Sending a Verification Request
Follow these steps to send a verification code and approval link to any email address:
In the left sidebar, click Channels. Locate the Email from Timelier card and click the edit / manage icon () on the right, or access the Manage Verified Email Addresses screen directly.
In the To: input field, type the complete email address you wish to verify (e.g. [email protected] or [email protected]).
Provide the identity your recipient will recognize:
- Sender Name: Enter your full name or business name (e.g. Dr. Jane Smith or Acme Consulting).
- Sender Email: Select an authorized email address from the dropdown menu (your primary Timelier login email or any connected Google/Microsoft account).
Review the Message Preview box to inspect the verification message that will be delivered:
[Your Name] ([Your Email]) wants to send you reminders using Timelier.
Your verification code is: xxxxxx
Send them this code or enter it at this link: https://app.timelier.com/v-email?t=...
Click Send Verification to dispatch the invitation immediately.
Completing Verification
Verification can be completed through either of two straightforward methods:
- One-Click Email Link (Recommended): The recipient opens the verification email in their inbox and clicks the secure confirmation link. The link automatically verifies their address without needing to manually copy and paste codes.
- Manual Code Entry: The recipient sends you the 6-character code shown in their email. In the Pending Verification section of your Timelier dashboard, enter the code in the text box next to their email address and click Verify.
Managing Pending Verifications
Every outstanding verification request appears in the Pending Verification list with its expiration date and time:
- Expiration: Verification requests remain active for 24 hours. If not completed within that period, the request expires and a new invitation must be sent.
- Resend Button: If your recipient did not receive the email or it got lost in their junk folder, click the Resend button next to their listing.
- Cooldown Protection: To prevent accidental spamming, the Resend button includes a 60-second cooldown timer () before another email can be triggered.
Using Verified Emails in Reminder Rules
Once verified, the email address moves into your Verified Emails list and is immediately available in the reminder rule builder:
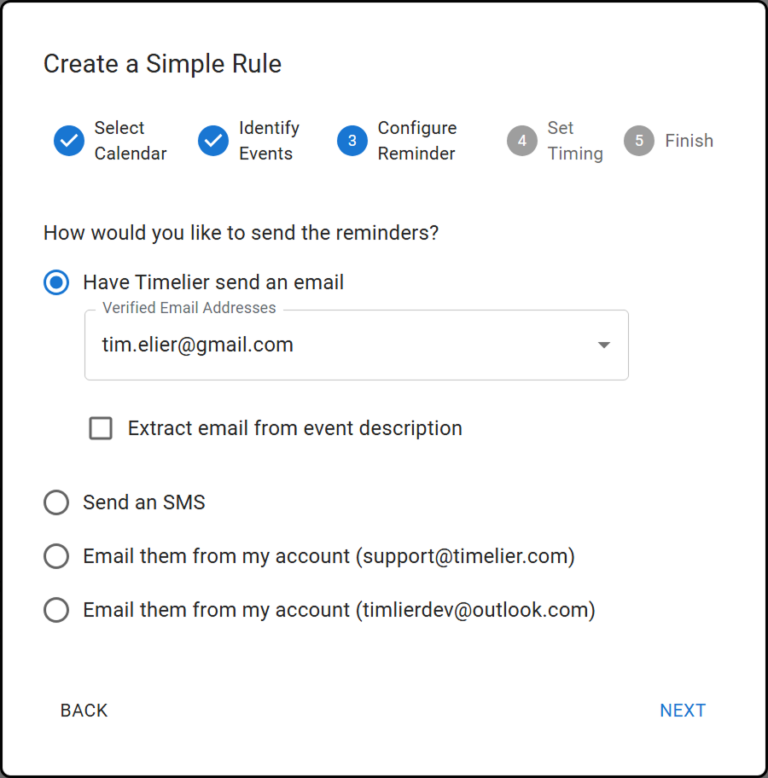
Verified email addresses appear directly in the "Verified Email Addresses" dropdown when configuring an Email from Timelier rule.
When creating or editing a rule (in either the Simple Rule Wizard or Advanced Editor):
- Select Have Timelier send an email as your reminder delivery method.
- Open the Verified Email Addresses dropdown.
- Choose the verified recipient address you wish to target.